

As promised, it’s finally here!
To all Anpanman fans, thank you for being patient with me. You can now make your own Anpanman amigurumi with my free pattern. Yay!
If you don’t already know who Anpanman is, you must, must watch the Sore ike! Anpanman series! I recently watched the Sore Ike! Anpanman: Ruby no Negai movie here, if you’re interested!
Anpanman is a superhero with an anpan (Japanese bean jam-filled pastry) for a head. It’s a strange sight, but Anpanman doesn’t mind sharing a bit of his head with the hungry children that he comes across during his adventures.
I first made an Anpanman for my boys when they were still snug in my belly. You can see what it looks like here, along with some Anpanman buns that I baked 🙂
I decided to make another cuter version after seeing all the wonderful Anpanman cookies and buns on Instagrammer @sachi ina’s feed! Her makes are incredibly awesome! I’ve been trying my hand at making cute chigiripan and illust pan (bread rolls with cute prints in them) but I am yet to be satisfied with the results. As I type this, I have a loaf of panda illust pan that I baked this evening, waiting to be sliced and discovered. If you see a picture of it on my Instagram, it means it was a success!

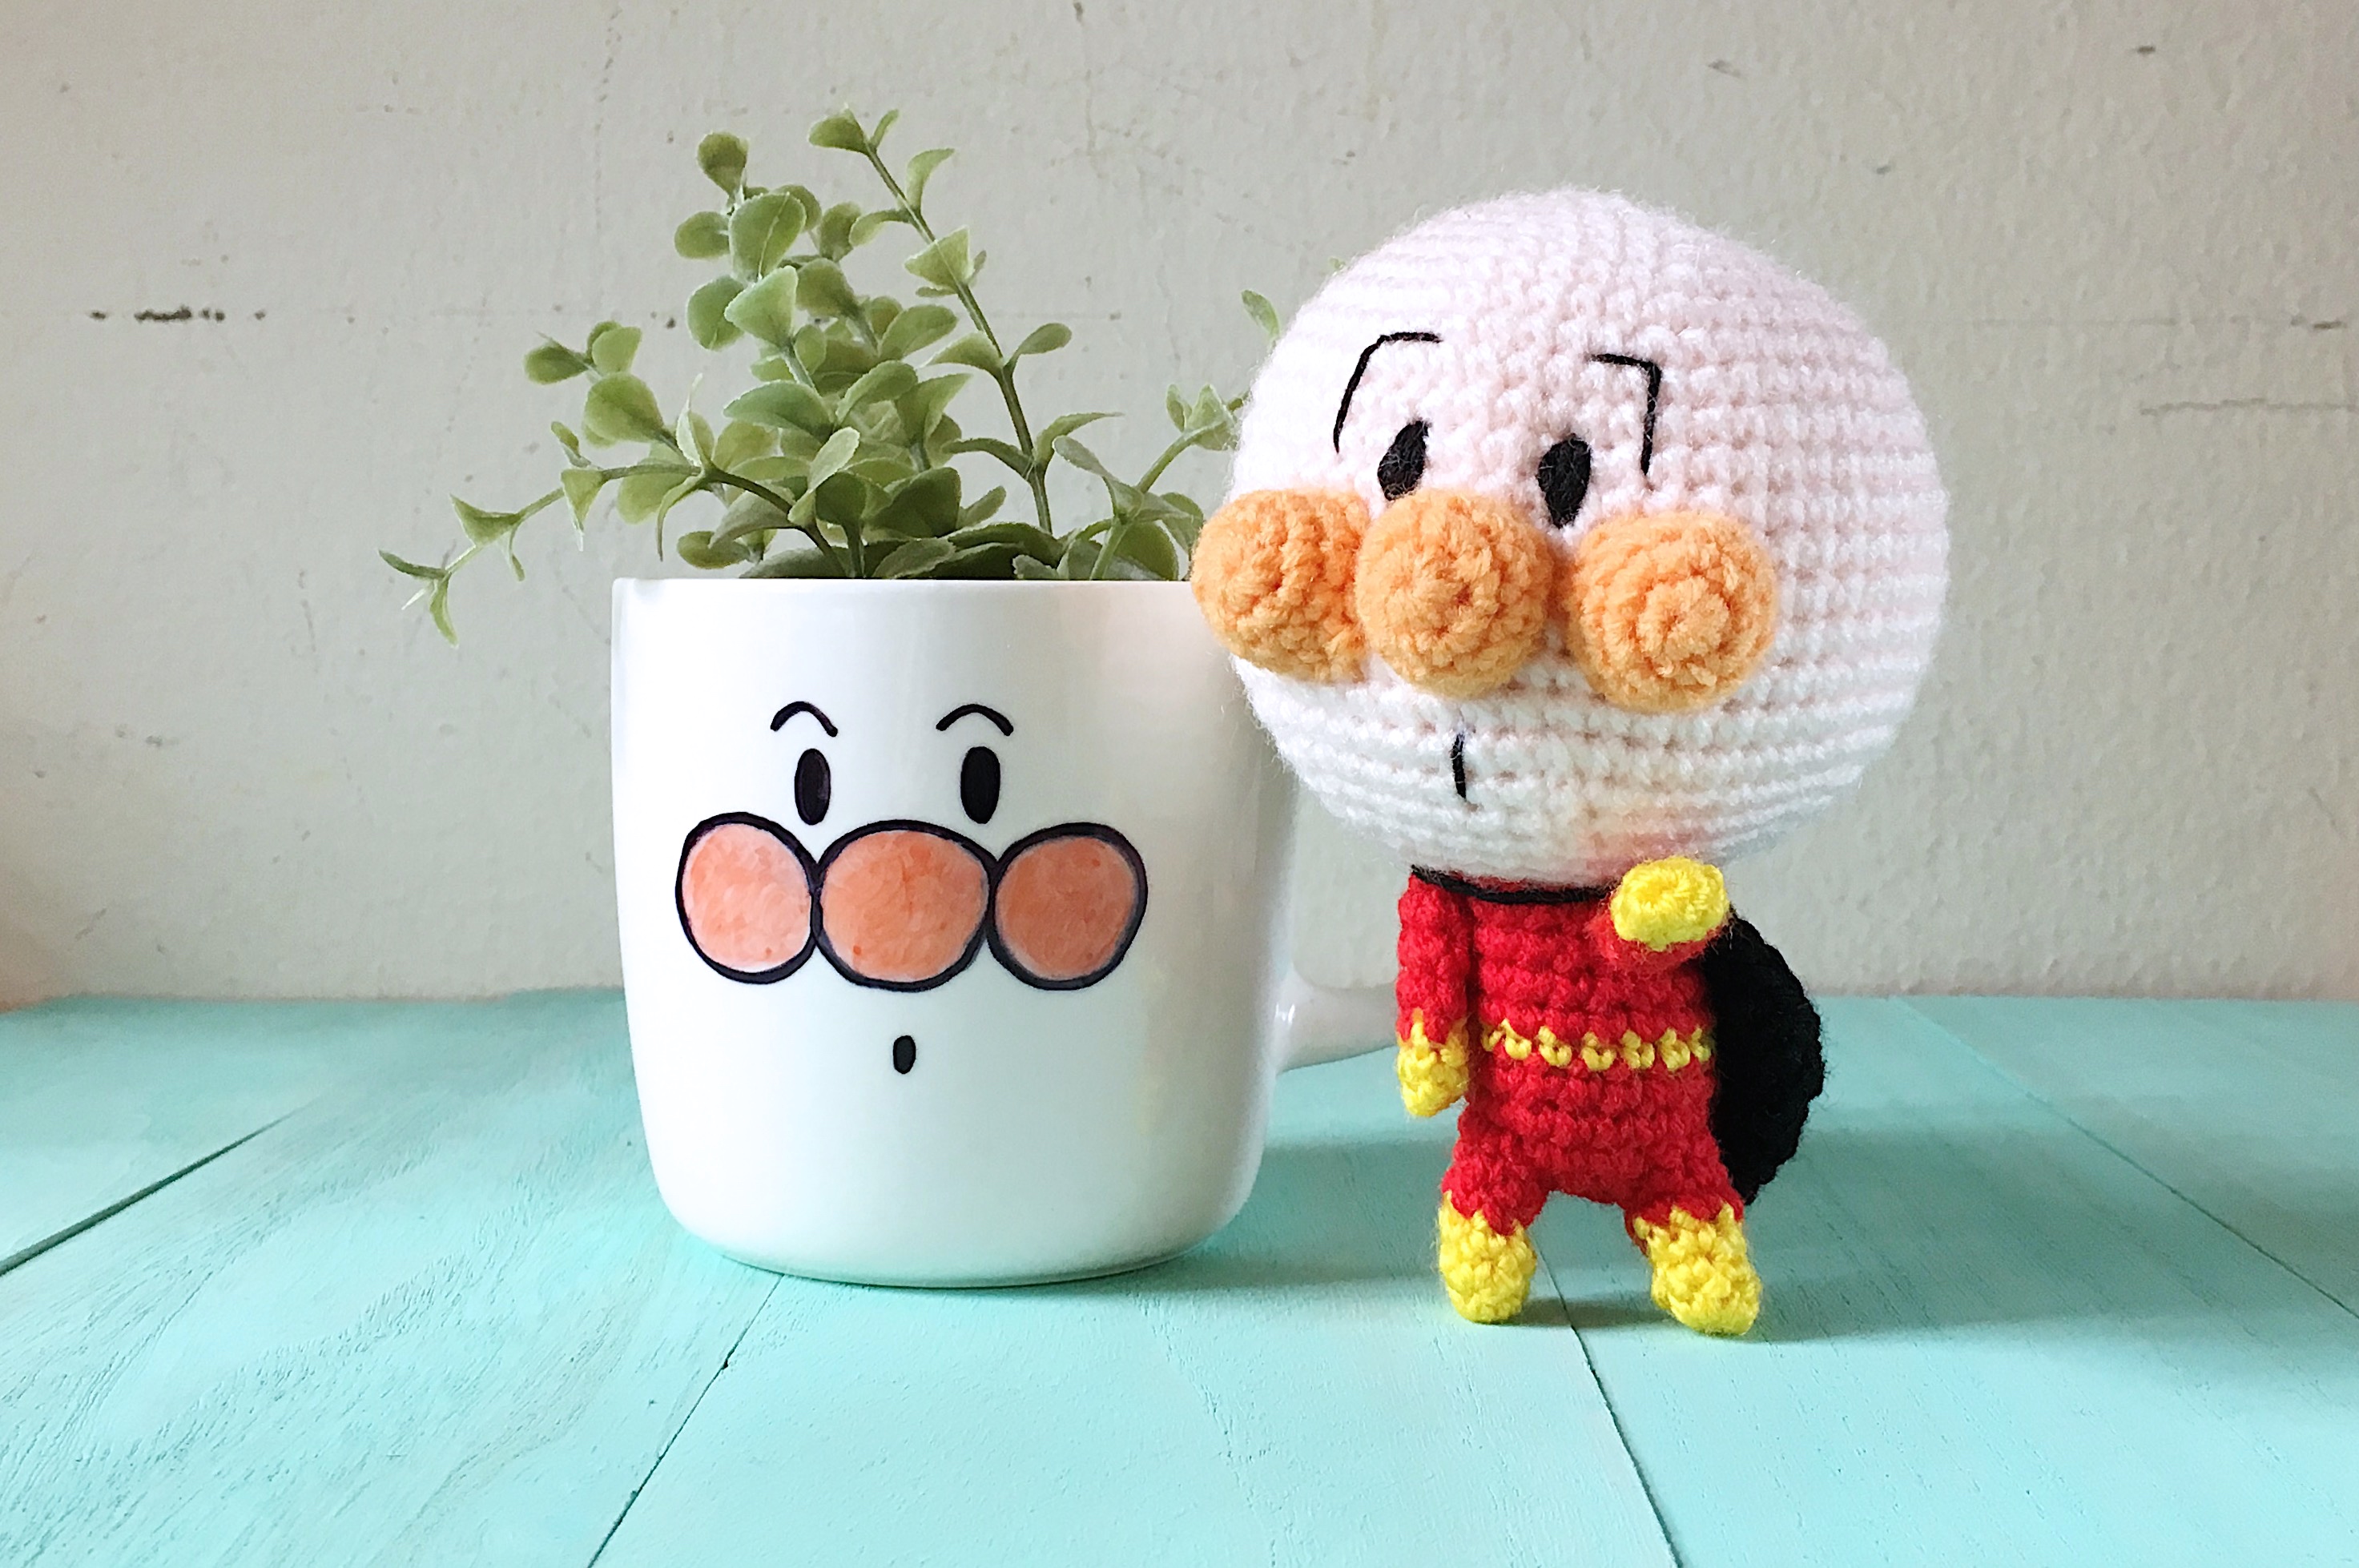
Anpanman amigurumi pattern by amiguruMEI
アンパンマンのあみぐるみ
Skill level: Intermediate
Duration: About 6 hours
Description: Anpanman is a popular Japanese character from a picture book series written by Takashi Yanase. I first fell in love with the strangely-cute superhero when I chanced upon its anime series and saw Anpanman pull off a piece of anpan from his head (which is literally an anpan, or bean jam-filled pastry) to feed a hungry child! The series comes with its host of colourful characters and I hope to be able to crochet the rest of them soon!
Abbreviations
• Ch: chain
• Sc: single crochet
• Dc: double crochet
• Inv dec: invisible decrease
Materials & Tools
2.5mm hook
Acrylic yarn in skin colour, orange, red, yellow and black
Black crochet thread
Darning needle
Polyester fiberfill
Head
With skin colour yarn:
Round 1: Sc 6 in magic ring {6}.
Round 2: [Inc] around {12}.
Round 3: [Inc, sc 1] around {18}.
Round 4: [Inc, sc 2] around {24}.
Round 5: [Inc, sc 3] around {30}.
Round 6: [Inc, sc 4] around {36}.
Round 7: [Inc, sc 5] around {42}.
Round 8: [Inc, sc 6] around {48}.
Round 9: [Inc, sc 7] around {54}.
Rounds 10-19 (10 rounds altogether): Sc around {54}.
Round 20: [Inv dec, sc 7] around {48}.
Round 21: [Inv dec, sc 6] around {42}.
Round 22: [Inv dec, sc 5] around {36}.
Round 23: [Inv dec, sc 4] around {30}.
Round 24: [Inv dec, sc 3] around {24}.
Round 25: [Inv dec, sc 2] around {18}.
Fill with stuffing. The shape of the head should be spherical.
Round 26: [Inv dec, sc 1] around {12}.
Round 27: [Inv dec] around {6}.
Fasten off and weave in ends.
Nose and cheeks (Make 3)
With orange yarn:
Round 1: Sc 6 in magic ring {6}.
Round 2: [Inc] around {12}.
Rounds 3-4: Sc around {12}.
Fasten off and leave a long end for sewing.
Fill with a tiny bit of stuffing.
Body
With red yarn:
Round 1: Sc 6 in magic ring {6}.
Round 2: [Inc] around {12}.
Round 3: [Inc, sc 1] around {18}.
Rounds 4-5: Sc around {18}.
Change to yellow yarn.
Round 6: Sc around {18}.
Switch back to red yarn.
Round 7-10 (4 rounds altogether): Sc around {18}.
Fasten off and leave a long end for sewing.
Fill with stuffing.

Cape
With black yarn:
Row 1: Ch 10. Turn work.
Rows 2-14 (13 rows altogether): Sc 9, Ch 1. Turn work.
Fasten off and leave a long end for sewing.
Arms (Make 2)
With yellow yarn:
Round 1: Sc 6 in magic ring {6}.
Round 2: Sc around {6}.
Change to red yarn.
Rounds 3-6 (4 rounds altogether): Sc around {6}.
Fasten off and leave a long end for sewing.
Legs (Make 2)
With yellow yarn:
Round 1: Sc 7 in magic ring {7}.
Rounds 2-3: Sc around {7}.
Change to red yarn.
Rounds 4-5: Sc around {7}.
Fasten off and leave a long end for sewing.
Assembly
1. Sew nose and cheeks onto the head. They should fall below Round 13.
2. Sew on the eyes, eyebrows and mouth (please see tips on **Designing the face below)
3. Sew body onto head.
4. Sew on arms. You can position them however you like. I gave mine an “Anpunch!” pose.
5. Sew on the legs.
6. Sew on the cape. I just looped the cape around Anpanman’s neck and weaved in the ends.

**Designing the face
Eyes
1. The eyes are sewn below Round 11 of the head, using black crochet thread
2. Each eye is sewn with 12 vertical backstitches that are 2 stitches long.
3. There should be a space of 3 stitches in between each eye.
Eyebrows
1. Instead of rounded eyebrows, I gave my Anpanman “L” shaped ones.
2. I made a loose diagonal stitch that is 3 stitches long and then made a smaller stitch to hold the corners together. Alternatively, you can try making 2 backstitches in the shape of an L (I think the effect would be quite the same!)
Mouth
1. Just one vertical backstitch, 2 stitches long.

As this is an original amiguruMEI pattern, kindly do not claim it as your own. You may place a link to this pattern from your site, but please do not repost it onto your page. Send me a picture or tag me on Instagram @amigurumei when you’ve made your own Anpanman 🙂
