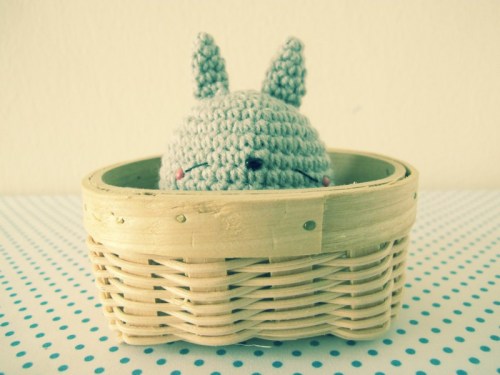
Welcome to amiguruMEI’s first giveaway do, in conjunction with Christmas and the spirit of giving, of course!
We have five Sleeping Totoros up for grabs and the best part is, anyone can win!
Taking part is easy – just visit Super Cute Kawaii, which is one of my favourite daily site haunts, and follow the super-easy instructions listed on the amiguruMEI giveaway post here.
You have one week (only ONE week) to up your chances of owning an original amiguruMEI handmade Sleeping Totoro, so がんばってね (do your best)!
Shirokuma-kun and Panda-kun’s close friend is Penguin-san, a black, white and yellow-tinted emperor penguin.
However, his whereabouts have yet to be sighted in the worlds of amiguruMEI.
{Shirokuma-kun and Tuxedo-san are having a chat about the weather}Panda-kun: Penguin-san, Penguin-san!Tuxedo-san: ???Panda-kun: What are we having for lunch later?Tuxedo-san & Shirokuma-kun: ???Shirokuma-kun: Panda-kun, this is Tuxedo-san.Panda-kun: Ehhhh?Panda-kun: Why are you wearing a tuxedo today, Penguin-san?Shirokuma-kun: Sigh…
Shirokuma-kun loves bad puns, and is the owner of an organic cafe in Japan.
His favourite customers are Penguin-san and Panda-kun.
The fuzzy polar bear is the star character in Aloha Higa’s Shirokuma Cafe (しろくまカフェ) manga, which was recently adapted into a super hilarious anime series. Also called Polar Bear Cafe in English, the show follows the every day of a group of animals and humans having a cuppa at the cafe.
Irrashai… (いっらしゃい, Welcome…)
My kuma (bear) collection…Jaa ne! (じゃあ ね, See you!)
Cheburashka is a Russian character from a 1966 children’s literature.
The little creature, while looking like a baby monkey, is unknown to science.
His name means “tumbled” in Russian colloquialism, given to him by a crocodile named Gena after the cute little guy makes his first appearance by tumbling out of a crate of oranges.
…Gena?Chiyo-chan: Ah, there you are!Chiyo-chan: Wee!Sigh.
Don’t miss the fabulous Japanese anime Cheburashka arere!
Small pebbles or marbles (to weigh Molang-san down)
Body
With white yarn and a 2.50mm hook:
Round 1: 6 sc in magic circle (6)
Round 2: 2 sc in each sc around (12)
Round 3: *2 sc, sc in next sc*, repeat 6 times (18)
Round 4: *2sc, sc in next 2 sc*, repeat 6 times (24)
Round 5: *2 sc, sc in next 3 sc*, repeat 6 times (30)
Round 6: *2 sc, sc in next 4 sc*, repeat 6 times (36)
Round 7: *2 sc, sc in next 5 sc*, repeat 6 times (42)
Round 8: *2 sc, sc in next 6 sc*, repeat 6 times (48)
Round 9: *2 sc, sc in next 7 sc*, repeat 6 times (54)
Round 10 – 24: Sc in each sc around (54)
Pop in the eyes – it should fall below the 11th row, with 9 stitches in between.
With dark brown embroidery floss, sew on the nose/mouth, centred between the eyes.
Round 25: *Inv dec, sc in next 7 sc*, repeat 6 times (48)
Round 26: * Inv dec, sc in next 6 sc*, repeat 6 times (42)
Round 27: * Inv dec, sc in next 5 sc*, repeat 6 times (36)
Round 28: * Inv dec, sc in next 4 sc*, repeat 6 times (30)
Round 29: *Inv dec, sc in next 3 sc*, repeat 6 times (24)
Round 30: *Inv dec, sc in next 2 sc*, repeat 6 times (18)
Begin stuffing the body. Add some small pebbles so Molang-san will stand upright on its own. Top off with more stuffing.
Round 31: *Inv dec, sc in next 1 sc*, repeat 6 times (12)
Round 32: Inv dec all around (6)
Fasten off and weave in ends.
Ears (make 2)
With white yarn and a 1.75mm hook:
Round 1: 5 sc in magic circle (5)
Round 2 – 4: Sc in each sc around (5)
Fasten off and leave a long end for sewing.
Arms (make 2)
With white yarn and a 1.75mm hook:
Round 1: 5 sc in magic circle (5)
Round 2 – 4: Sc in each sc around (5)
Fasten off and leave a long end for sewing.
Feet (make 2)
With white yarn and a 1.75mm hook:
Round 1: 7 sc in magic circle (7)
Round 2: Sc in each sc around (7)
Fasten off and leave a long end for sewing.
Tail
With white yarn and a 1.75mm hook:
Round 1: 7 sc in magic circle (7)
Round 2: Sc in each sc around (7)
Fasten off and leave a long end for sewing.
Assembly
Sew on the ears, arms and feet.
Sew on the tiny tail.
Needle-felt some pink wool roving onto the cheeks.
Ta da!
As this is an original amiguruMEI pattern, kindly do not claim it as your own. If you plan to sell the amigurumi made from this pattern, I would be delighted to have you mention amiguruMEI as the pattern provider. You may place a link to this pattern from your site, but please do not repost it onto your page. Remember to share a picture of your own kawaii versions of Molang-san with amiguruMEI!
Kamsahamnida! (Thank you!)
Psst! Here’s how we do our invisible decreases:
1) Insert your hook into the front loop of the first stitch (2 loops on hook). Do not yarn over.
2) Then insert your hook into the front loop of the next stitch. According to June Gilbank of Planet June, “To do this, you’ll need to swing the hook down first so you can insert the hook under the front loop (3 loops on hook).”
3) Yarn over and draw through all three loops on the hook. Invisible decrease completed!
Meet Molang, the kawaii but grumpy fat rabbit from Korea!
While lettuce may be his favourite food, he’s not at all opposed to nibbling a corner or two of onigiri from time to time.
Meimoirs recently teamed up with Samantha Lee of Eatzy Bitzy for another charaben + amigurumi picnic adventure and had loads of fun witnessing the magic of rice being transformed into tubby little bunnies!
Can I have some kimchi?Can I have a bite?Ugh…can you help me get up?Make-up time!
P/S Free amigurumi pattern for Molang will be out next week! Yay!
Make your own special edition rainbow Pandapple-chan!
Materials
2.50 mm hook
1.75mm hook
Similar sized yarn in rose pink, white, black, apple green, pastel pink, pastel yellow, pastel green, pastel blue
Embroidery thread in black and white
Darning needle
Carpet needle (with large eye and sharp tip)
Polyester fiberfill
A small piece of pink felt
Eyes (make two)
With black embroidery floss and a 1.75mm hook:
Chain 4
Round 1: Starting in second chain from hook, sc in the next 2sc, 3sc in the last sc.
Round 2: Rotate the foundation row, don’t turn it. Sc in the next 2sc, 3sc in the last sc.
Fasten off and leave a long end for sewing. Weave in the shorter end of the thread to neaten any gaps.
With white embroidery floss and a darning needle, sew about 8 times over one of the stitches, near the top of each eye.
Head
With rose pink yarn:
Round 1: 6 sc in magic circle (6)
Round 2: 2 sc in each sc around (12)
Round 3: *2 sc, sc in next sc*, repeat 6 times (18)
Round 4: *2sc, sc in next 2 sc*, repeat 6 times (24)
Round 5: *2 sc, sc in next 3 sc*, repeat 6 times (30)
Round 6: *2 sc, sc in next 4 sc*, repeat 6 times (36)
Round 7: *2 sc, sc in next 5 sc*, repeat 6 times (42)
Round 8: *2 sc, sc in next 6 sc*, repeat 6 times (48)
Round 9: *2 sc, sc in next 7 sc*, repeat 6 times (54)
Round 10: *2 sc, sc in next 8 sc*, repeat 6 times (60)
Round 11 – 12: Sc in each sc around (60)
Change colour to white, using the jogless crochet technique via Amigurumi To Go’s video tutorial here.
Round 13 – 20: Sc in each sc around (60)
Round 21: *Inv dec, sc in next 8 sc*, repeat 6 times (54)
Start sewing on the eyes – they should fall below Round 15. There should be 8 stitches between the eyes.
In the centre, sew on the nose and mouth. Use the carpet needle for this so you can go in-between stitches.
Round 22: *Inv dec, sc in next 7 sc*, repeat 6 times (48)
Round 23: * Inv dec, sc in next 6 sc*, repeat 6 times (42)
Round 24: * Inv dec, sc in next 5 sc*, repeat 6 times (36)
Round 25: * Inv dec, sc in next 4 sc*, repeat 6 times (30)
Round 26: *Inv dec, sc in next 3 sc*, repeat 6 times (24)
Round 27: *Inv dec, sc in next 2 sc*, repeat 6 times (18)
Begin stuffing the head.
Round 28: *Inv dec, sc in next 1 sc*, repeat 6 times (12)
Round 29: Inv dec all around (6)
Fasten off and weave in ends.
Body
With white yarn:
Round 1: 6 sc in magic circle (6)
Round 2: 2 sc in each sc around (12)
Round 3: *2 sc, sc in next sc*, repeat 6 times (18)
Round 4: *2sc, sc in next 2 sc*, repeat 6 times (24)
Round 5 – 9: Sc in each sc around (24)
Round 10: * Inv dec, sc in next 2 sc*, repeat 6 times (18)
Fasten off and weave in ends.
Dress
With pastel pink yarn and a 1.75mm hook:
Chain 26. Depending on the type of yarn you’re using, you may have more or less chain stitches. Just remember to measure the length of the chain against Pandapple-chan’s body.
Slip stitch to first chain to form loop.
Round 1 – 2: Sc in each sc around (25).
Change colour to pastel yellow.
Round 3: Sc in each sc around (25).
Round 4: *2 sc, sc in next sc*, repeat all around. (It’s perfectly alright if your last stitch happen to be a 2sc)
Change colour to pastel green.
Round 5 – 6: Sc in each sc around.
Change colour to pastel blue.
Round 7 – 8: Sc in each sc around.
Fasten off and leave a long end for sewing.
Arms (make 2)
With black yarn:
Round 1: 6 sc in magic circle (6)
Round 2 – 6: Sc in each sc around (6)
Fasten off and leave a long end for sewing.
Legs (make 2)
With black yarn:
Round 1: 5 sc in magic circle (5)
Round 2: 2 sc in each sc around (10)
Round 3 – 4: Sc in each sc around (10)
Round 5: Sc2together all around (5)
Fasten off and leave a long end for sewing.
Ears (make two)
With black yarn:
Round 1: 6 sc in magic circle (6)
Round 2: 2 sc in each sc around (12)
Round 3: *2 sc, sc in next sc*, repeat 6 times (18)
Round 4: Sc in each sc around (18)
Round 5: *Inv dec, sc in next sc*, repeat 6 times (12)
Fasten off and leave a long end for sewing.
Leaf
With apple green yarn:
Round 1: 3 sc in magic circle (3)
Round 2: 2 sc in each sc around (6)
Round 3: *2 sc, sc in next sc*, repeat 3 times (9)
Round 4 – 5: Sc in each sc around (9)
Round 6: *Sc2together, sc in next 1 sc*, repeat 3 times (6)
Fasten off and leave a long end for sewing.
Apple stem
With black yarn:
Chain 12.
Fasten off and leave a long end for sewing.
Weave the tail end of the yarn in between each chain to fill up any gaps.
Tail
With black yarn and a 1.75mm hook:
Round 1: 5 sc in magic circle (5)
Round 2: Sc in each sc around (5)
Fasten off and leave a long end for sewing.
Apple indentation
Cut a piece of rose pink yarn, about 6 inches in length.
Thread the yarn through from the bottom part of Pandapple-chan’s head, to the top part of the head, in the centre.
Make one stitch and go back down to the bottom of the head. Gently tug on the yarn to create a slight indentation.
Knot off ends.
Assembly
Sew the dress on the body.
Stuff the body and sew it onto the head.
Sew on the arms.
Sew on the legs.
Sew on the leaf.
Sew on the stem.
Sew on the ears.
Sew on the tail.
Cut two small pieces of pink felt and glue them on Pandapple-chan’s cheeks. Try needle-felting on some pink wool for a different effect.
Ta da!
As this is an original amiguruMEI pattern, kindly do not claim it as your own. If you plan to sell the amigurumi made from this pattern, I would be delighted to have you mention amiguruMEI as the pattern provider. You may place a link to this pattern from your site, but please do not repost it onto your page. Remember to share a picture of your own kawaii versions of Pandapple-chan with amiguruMEI!